Sunday, February 26, 2012

Wonder Woman - It's all in the Details

Leading up to Halloween, I was sort of stuck on the sidelines. Most of the costume involved sewing which is Dejathoris' main domain. Don't get me wrong, I kinda know how to sew, but I can't whip up a costume, let alone a skirt in less than ten minutes like she can!

So I decided to undertake a very detailed three day process. To ensure proper nail preparedness (dry nails before each step) I waited overnight before moving on. Turning my nails into Wonder Woman-esque Nails! I thought I would share the pics:

- Step One, Paint with base red.Keep in mind, I always use a base coat to help prevent staining and to assist in proper nail health and all that jazz. I am particularly fond of Essie's All in one Base.
- Step Two, using reinforcements, a tip I picked up on Jezebel.com cover the base of the nail. That way when you're painting the tips you get the perfect curve. Reinforcements also don't peel off the base coat, like tape will in many cases.


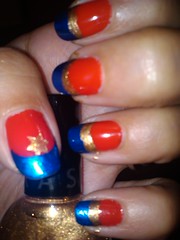
- Step Three, I WANTED to use those sticker templates to paint gold stars onto each nail. However, those things are garbage. They rip right off and are essentially a one nail use. Unless I'm using it wrong. However, this is the second time I tried, and I got the same results. After all that work,  only one nail got the gold star. I then painted stripes inbetween the blue and red.

- Step Four: TOP COAT! If you're going to spend three days painting your nails, you're going to want your work to last!

Sunday, February 19, 2012

Clash of the Titans - Perseus' Shield

 What we're working on:
In progress: Perseus - Clash of the Titans (2010)
Staging: 1) Andromeda & Medusa - Clash of the Titans (2010)
               2)Katniss Everdeen; Effie Trinket - The Hunger Games
              

So Guavious was home last weekend and I got to watch him create his shield! It was pretty impressive... Who would have thought this piece of armor would have only really taken one afternoon! Last summer he purchased a large piece of styrofoam about two inches thick. He then took a blow torch to it and it created the exact look we needed to make Persus' shield! So this weekend he purchase a much thicker piece of styrofoam for durability, approx 4 or 5 inches thick. He cut the top and bottom curves into them to mimic the shape of the shield and went to town creating the shape. The video below is how he created the edges. He had to be really careful with the flame! And I'm going to CYA and say "Don't try this at home!"

He then used the flame to carve out the base of the shape. It took a couple of passes to get the dimension and the look that we wanted, but you want to take your time. If I've learned anything it's that you should start your definition slowly. Not only so if you make a mistake you can work around it, but also you don't go to far! All the ridges should be fairly equal, from what I observed, and that's just for stability's sake!


The Styrofoam was pretty hot so it took about an hour to cool off, he then took some different acrylic paints to create the different layers and dimension. The base is a mixture of Asphaltum Americana Acrylic paint (Grey/Brown), and Lamp Black Americana Acrylic paint. Once that dried he then used Dazzling Metallic Elegant Finish Acylic paint in Dark Patina (greenish) to add highlights and extra dimension.  On the left is just the black and grey/brown, below is the green highlights.


After letting it dry overnight we then attached a piece of construction quality aluminum to the back to mimic the mirror. We were originally going to buy and adhesive mirror for the back. One of those decorative wall stickers? But those are EXPENSIVE for anything larger than their standard size, and the shield is anything but standard size!


Haven't really done anything this week for Andromeda and Medusa.... So moving on to the Hunger Games. Effie Trinket's Eyelashes arrived! YAY!

So in three weeks we've been able to get 90% of Perseus complete! Woot Woot!
 

Thursday, February 16, 2012

The Fifth Element - The set that Started it All!


Fifth Element:

Who: LeeLoo Dallas, Korbin Dallas, Diva Plavalaguna (Guest starring Zorg & two Flight Attendants)
When: LeeLoo and Korbin are post battles and the Diva before she’s dead (spoiler alert?)
Who’s: Luc Besson’s The Fifth Element

This is the costume set that started it all! Over the years we’ve upgrade (and lost) pieces, made others join in at last minute, and have won a couple of Halloween costume contests with this group. We’ve all watched the movie hundreds of times over, and quote it incessantly in and out of costume. It’s important to note that these costumes are iconic. Jean-Paul Gaultier produced and designed over 950 costumes for this film. Each piece is inspiring and memorable, and we do our best to replicate within our means.

Fun Facts, we have a rotating cast of flight attendants, and we’re still on the hunt for our elusive Ruby Rod, and perhaps one day we’ll let the more shy cast member finally dress up as the Priest or David. But our theory is what’s the point of replicating Gaultier if you can’t be the craziest?

LeeLoo Dallas
LeeLoo Dallas, played by Mrs Spiderman (me), was a pretty straightforward costume. Until you started debating on whether to wear the Orange Suspenders outfit versus the Band-Aids outfit. When it was realized that death would be imminent by putting me in the Band-Aids costume, the team focused on making the Orange Suspenders. In the film, the actual suspenders look to be made of some pliable plastic or rubber compound. For comfort’s sake, ours are made out of polar fleece. Bright orange polar fleece cut into shape with holes inside to mimic the look. The pants were old dance pants that were spray painted silver. The piping was originally sewed on, but then it was glued on to reinforce. The top was an old ribbed tshirt that was stitched up to be the fitted midriff. Here’s where the outfit gets more interesting... The wig. In order to get a ‘battled’ look, the wig was tousled and at the top there are individual dreads created. The best thing about this wig is that the more it travels, the better it turns out. There’s no accessories other than the multipass, and some times, if they are available, orange eyelashes are worn with the whole set. Makeup is kept to a minimal, but sometimes black eyeliner is used around the eyes, and smudged around the face to appear as grease and dirt. Funny fact, the better picture of the wig is below, because above, I completely lost the wig days before leaving for Norwescon 34, so the above wig was a last minute pick up!

LEELOO DALLAS MULTIPASS (she knows it’s a multipass)
So there’s the original (also last see in the image!), and there are the ones that have followed it. I have lost about 4 multipasses to date. I've also forgotten to pack it when traveling, and forgotten to bring it along when going out. The first and ultimate multipass was a Ducktape coin purse with a zoomed in shot of Leeloos full multipass information. This was awesome because it carried around costume id and real id (and money!). However, it is lost in the abyss and resulted in a zoomed in shot of the multipass in an empty cd jewel case. The benefit of this one is it shows up better on pictures, but it’s not as cool as the original.I actually found one of the old Multipasses in a drawer while I was organizing my house a few weeks back... I'm not sure how it got there in the first place..

The Diva
This is the Keynote piece of this costume trio. I believe that every one of our costume sets has one piece or person that needs to be more recognizable than the rest, and the costuming stands out above the others, thus Keynote. The Diva is just that... When Dejathoris dons her full regalia, people immediately get it right. I’ve tasked her with writing the total “how she did it”:

This one was a challenge – how were we going to recreate a 7 foot tall blue tentacled alien opera star?!?!?   The basis of this costume was a skirted version of a hooded Zentai body suit (covering everything but the face), which we ordered off of eBay.  Because this fetish-wear came with the attached leggings, we were able to remove this excess fabric for use in creating the headpiece and tentacles so that there would be an exact match      and the overall look would be uniform.  The skirt was lengthened using black spandex fabric in a circle-cut to create the “mermaid” style hem.  The two fabric colors of black and blue were then blended using black spray-paint.  This also added a bit of length to hide the 6” platform heals that normally 5’5” Dejathoris wore to try and create some of the Diva’s height.   This illusion was aided by making the headpiece about 2 feet tall, which was accomplished by stretching a tapered tube of the spandex fabric over a standard bike helmet, then filled out with pillow stuffing.   To make the super-long fingers, the tips on the built-in gloves were stretched and pulled, then false nails were glued onto the ends. The crown, back-piece, gauntlets, collar and belt were all cut from vinyl and attached with Velcro.   There was no pattern for these, just a cut and fit approach that took a lot of trying on, taking off, adjusting and trying on again.

For the face-paint we used an old body-makeup trick that might not be the best recommendation for every-day wear, but has proven very successful and cost-effective for us many times in the past:  Colored hairspray (the kind you find at the dollar stores around Halloween).   An even spray of blue, sealed with Graftobian Makeup Setting Spray™  created a uniform skin tone that matched the spandex.  Black eyeliner finished the look by highlighting brows, lips and the eyelids.   

Unfortunately, Dejathoris can’t carry a tune in the bucket – so a full on Diva performance in this costume is out of the question – but it is surprisingly comfortable and she has been know to break into the “Diva Dance” on more than one occasion!

Korbin Dallas
The funniest thing about this costume is that when Guavious is standing by himself people have thought or asked if he was NUMEROUS Bruce Willis characters... Think about it, how many times has Bruce Willis been in a ripped tux with blood all over it... Let alone the fact that we coat Guavious with blue blood as well to create some continuity with LeeLoo. Something we noticed was an important part of the look was the hair. We either dye Guavious’ hair blond(er), or let him hang out in the sun for long periods of time to bleach it. We also make sure to keep it pretty short. When it’s longer, you lose the aesthetic and the look actually falls apart a little (attention to detail and all that!). This is another simple costume as over the years we’ve misplaced dozens of white tux shirts and had to run to Value Village to get a new one to destroy. The set is simple though, white ripped tux shirt, black pants, black suspenders, red blood paint, and blue dye.  Take your time layering the red and blue wounds.

Zorg
Jean-Baptiste Emmanuel Zorg is an iconic villain with an incredible sense of style! Since Zorg’s most distinguishing feature is his unique hair piece, we knew that had to be our starting point.  We began with a Marilyn Manson wig, which had the right blackness in terms of hair color and the half-shaved look we needed.  A little styling and the shaggy side of the wig was turned into a slick bob.   The ‘bald’ side of the wig was transformed from white to beige using Revlon Color Stay foundation, and then covered in Saran wrap to get the look of Zorg’s plastic headpiece.    When sewing the shiny metallic shirt, craft foam was used to reinforce an oversized collar that would stand up around the ears.  Simple suiting fabric with a bold pinstripe formed the basis of his knee length over-vest.   Final touches included adding black slacks, and one fantastic Nerf blaster as a stand-in for the infamous ZF-1.

Zorg was used during a Halloween costume ball and once again the following year in Las Vegas. My favorite picture of Zorg also happens to have me photo bombing him. I think I was trying to be stealthy Leeloo at the time...At the end of the evening on our Vegas Halloween excursion, our Zorg removed his headpiece and vest, turned down the oversized collar on his shiny shirt and then added heavy gold rimmed sunglasses…. And volia!  Instant Elvis costume!!!


Flight Attendants
Over the years we have had a couple of different flight attendants join our group – lucky, this is a fairly easy costume to throw together as it’s the accessories and makeup that really rock this look:  
Step 1:  Find a tight, short, blue dress.  
Step 2:  Cut strategic key holes around cleavage and back into dress fabric. 
Step 3:  Cut hat, collar and boot covers out of blue craft foam, assemble and add “wings” cut from white craft foam using glue gun. 
Step 4:  Add a blonde bob wig and BLUE, BLUE, BLUE eyeshadow.  
Step 5:  Get dressed and board the shuttle for Folston Paradise!

 You can check out more of our pictures on our Flickr page here. We'll try to keep it up to date as possible!

Saturday, February 11, 2012

Calgary Comic Con - April 2012

Not Directly related to Costuming, and a little bit of a rant...

Alrighty, so generally we don't keep an eye on the Calgary Comic Con because it tends to be very very Trek focused. And as you might notice, we're not really that big into Trek... By that I mean, I LIKED the reboot movie and according to many Trekkies, you're not supposed to. (At least that's what I've heard by the Trekkies I've met).
So back to the Calgary Comic Con, two years ago the lead guest was Leonard Nimoy, and that was when he was on Fringe, but according to their website it was going to be Trek focused. Now don't get me wrong, I get it, Nimoy is mostly known for Trek, but I'm into Fringe. Big Time. So I was a little miffed. The next year the big guest was Shatner. So that time I really didn't care... However, two days before the con I found out that Christopher Judge was going to be guesting too. And he only had one panel, at 10am on Saturday morning. That's it. Myself and Guavious are pretty into Stargate so we were miffed about that. And on top of that, I'm not PAYING FOR A FREAKING AUTOGRAPH!

I started casually following Calgary Comic Con's reviews online, and heard many 'o awfulness about their lineups and organization. It seemed that it was mostly geared towards pay-for-autograph line ups and the panels were not so awesome. I don't know what the expectation level is, and I don't know if the bigger cons are mostly like this, since we stick to the smaller cons (if you categorize Norwescon as a smaller con) but I agreed with the commentors that predominantly focusing on the two minutes each fan gets per celebrity is pretty ridiculous. I understand that you need to make a profit, but be reasonable.

So I wake up one morning to my favorite radio station announcing that the lead guests for 2012 is.. dun dun duunnnn "Stark Trek: The Next Generation" Reunion! And the internet Trekkies when crazy! I figured, meh, whatevs, no one's around that weekend, I'm not going to go. However, over my lunch hour I head over to their website and and proceed to LOSE MY MIND. Other guests include:
- Adam West
- Amanda Tapping
- JOHN FREAKING NOBLE!
- Adam Baldwin
- JAMES MARSTERS!
- Jasika Nicole

I've officially lost my mind at this point... I'm thinking to myself trying to figure out who I can go with because I.NEED.TO.BE.THERE. Since I can't stop freaking out, I head over to Dejathoris' place after work and some how manage to convince her to go on the Friday with me. (I'm still working on the Sunday). She's going to be hanging out with me, then flying to Sask. for a wedding! Talk about geek dedication! All because we came to the decision to go as: The Hunger Games' Katniss Everdeen and Effie Trinket! So all in all, I'm going that weekend and I'm going to see if the rumors are true and make my own damn opinions.

I feel the need to also add that I will be deciding whether or not I'm going to suck up my pride and pay for a photo with James Marsters wearing the WWBD shirt. I TV stalk him like crazy. I watched Hawaii Five-O because I heard he was the Big Bad in it and continued to watch it until (SPOILER ALERT) they killed him at the beginning of season two (THOSE BASTARDS!). I watched Caprica, although I haven't made it through nearly enough Battlestar Galactica episodes to know what's going on because I read on io9 that he had a handful of episodes. Seriously I TV stalk him like crazy. I can't help it, I loved everyone in Buffy, I TV stalk a lot of them. More than anyone in the Whedonverse, really.


Update: We've moved up the completion schedule for The Hunger Games because we've now decided to dress up as Katniss and Effie for the movie premier!

Wednesday, February 8, 2012

What are we currently working on - Spring 2012

So I'm going to make every effort to document all the costuming making process as best I can... But I might forget for a while... And I was thinking about it, sometimes I'm going to want to talk about what we're working on right now rather than what we just finished... I will eventually get to my point...

So on one of my favorite author's sites/blogs they post what they are working on and where their current projects statuses... I thought I would try something similar....

What we're working on:
In progress: Perseus - Clash of the Titans (2010)
Staging: 1) Andromeda & Medusa - Clash of the Titans (2010)
               2)Katniss Everdeen; Effie Trinket - The Hunger Games

So let's say that "In Progress" is going to be the costume we're trying to get done RIGHT NOW, Staging could be anything from buying materials, shopping, making a mess in Dejathoris' house with all our crap stuff.

We, and by we I mean Dejathoris, found some amazing material called Wunderflex... I'm not sure if I'm spelling that right, I'll change it later if I'm told to. It is a heat malleable material that apparently pro and regular costumers use all the time to create everything... So we bought it to create the metal work on Perseus' armor. HOLY FRACKINSTOCK this stuff is super wicked. I'm going to try and see if Dejathoris wants to do her write up on it so I won't over share, but this stuff is good for beginners and GDDMN if it doesn't look pro when you're done! The pictures around here are of us trying to mount the Wunderflex "metal" pieces (post painting and staining) onto the leather backing. These are just pictures of the shin guards that Perseus wears. This is going to be the BEST.ARMOUR.EVER.


So while Dejathoris was workin on that, I was busy working on the "skirt" (I'm trying to find a more masculine name for it, thoughts?)... Now what really, really, really sucks? Finishing all the edges... I cut and measured 18 pieces staggering the lengths and widths in proportion to the images. As much as you think you might want a "rough" finished edge, you actually want to do as much finishing as possible... Dejathoris actually went to our Leathercraft class where they taught finished techniques and picked up a bevel. This little doodad smooths the edges of the leather and actually makes the end product look better... So learnings? Finish your damn edges...  We also decided to create a little bit of a border on each of the pieces. So we took an edging tool and ran it along about a quarter inch or so from the end. Once the pieces are stained we're going to make them "pop" by running over the border with a black sharpie. Another learning was that this leather is only 3.5 weight whereas our leather for the Steampunk Trio (of Evil) was a 4.5. The reason this is of note is because the 3.5 took to a sewing machine leather needle amazingly, while the 4.5 broke about 50 million of them. (No lie, I counted).


And finally, Staging wise, we picked up some really great stuff over the weekend. Sephora has a sale on the Eyelashes that Effie Trinket is wearing the in promotion pictures. They're the laser cutout eyelashes, the pattern is called "Deer and Butterfly". We also picked up a nice big Blond 'Fro wig from the dollar store. While we were at Bhatia Cloth House, we picked up some jewelery for Andromeda because my recent attempts at jewelery were running out of time, and costing way more than they should. (More on that later)... FINALLY, we stopped by a thrift store on our way home and found the perfect Katniss jacket. We're going for the "regular" Katniss look rather than the "Arena" look. That way we can take a few literary liberties.


Alright, I think I emptied my brain of all postable material... Guavious is back in town this weekend, and we're hoping to get some pictures of him trying out what we've finished of Perseus, so maybe we'll have something new sooner than we think! And like I said, I'm going to try and write summaries of all the different costume sets we have so far!


Cheers!

Deer and Butterfly Eyelashes @ Sephora:
http://www.sephora.com/browse/product.jhtml?id=P294802&categoryId=B70

Wonder Woman - Halloween 2011

Wonder Woman
Who: Wonder Woman (Mrs. Spiderman)
What: DC Comics Superhero (1941 – Present)

Alright people, we have two weeks to dress Mrs Spiderman as Wonder Woman for Halloween 2011... All because on the hunt for another costume piece we found Wonder Woman boots at a thrift store for $10... Yes, this is one of the only instances where we may reference price because they were $10 freaking dollars... WOOT WOOT! Although as you can see the costume turned out awesome, it took a lot of walking away... And that’s a very important piece of costuming advice... Sometimes you have to just walk away... If you’re frustrated, that’s going to show in your work, and then you’re stuck with something that looks like you were messy and unorganized. Even if that is the look you’re going for, you’re going to be stuck with something you’re not satisfied with...

So after we found the boots we headed straight to Fabricland and found everything but blue satin with gold stars (we found red satin with gold stars, purple cotton with yellow stars, seriously people!). However, Dejathoris was up in Red Deer meeting up with a friend and had some time to kill... Lo and behold, first stop Fabricland and bam! Blue satin with Gold Stars! On top of that, she found some gold rope for the “Lasso of Truth”. We then spent a few days searching the internet and clearance outlets for something that could pass as the red corset top. Much to our avail, red is apparently not available at a sale price in early Fall... However, at the Little Shop of Pleasures Dejathoris found a clearance Betty Boop costume which was made up of a red sparkly dress (using that term loosely) and a black wig that we had other plans for.

So you would think a simple tube dress would be fairly easy to finagle into a top, right? Nope. The dress was found at an exotic shop, right? So you would also assume that it was meant to fit an adult, but it would in fact not. We then quickly added a long zipper down the side to try and “make it work”... However, the dress itself when worn for over twenty minutes started to irritate and create red marks all over... Still trying to “make it work” we moved on to the logo. While trying to adhere strips gold vinyl to the dress, the stretchiness of the tube created a blob affect, rather than the superior logo in the final result. What happened here? We walked away...

Top number two started out as a faux corset with brown lace material over top of it... The plan was to take off the lace, adhere the logo, and add lacing to the back because the top was still too darn small! However, the top was also stretchy, so the same problem as the sparkle Betty Boop top! Will we ever win??? At this point, the countdown is less than 4 days away....

During this break we did however finish the Tiara & Bracelets. Whilst at Fabricland we picked up some “letterman” style numbers that happened to have a red star in them. That red star was ironed on to a tiara shaped piece of gold vinyl & elastic similar to a headband. The idea was to pull all of Mrs Spiderman’s hair above the elastic to hide it and help facilitate the high volume hair that Lynda Carter made so iconic. A helpful tip here is to make sure that the elastic, or anything around your head is never too tight... There’s the temptation to make things tight in your costumes so that you have the assurance that they won’t fall apart, but when things are around your face or head, if they are too tight, they’re just going to give you headaches. Once on, we used some bobby pins to pull the tiara elastic up a little higher so that it was not pressing on the ears or temples.

The Bracelets were the easiest to throw together. Some tapered squares of Gold Vinyl were cut and seamed while some Velcro stickers were put on the corners to hold everything together! Easy peasy!
One of the pieces we’re most proud of is the Logo. Since we’d decided to do more of a 40’s style Wonder Woman (with a skirt rather than hot pants/swimsuit style) we had our pick of logos. The Eagle is iconic and the stylized “W” is as well... But if you go back, you can find a stylized “W” that has a shape of an Eagle on the top. Perfect! We printed this off on regular paper, taped it onto the gold Vinyl, and then cut it out as if it were a fabric pattern. This was then glued on to some adhesive backed felt. So the front is the felt and the back has an adhesive to stick onto the top fabric!

Saturday morning, the party starts at 9... Everyone’s showing up at 7.... We still have no finished Wonder Woman. We realize that there is enough material from the cape to make a top from scratch, and so that’s where we go. Grabbing an old corset-style top pattern from Dejathoris’ pattern archives, we quickly cut out the material and head to the sewing machine. Earlier purchased was some black grommet tape to facilitate the lacing to ensure that the top stayed on. Although, once the Logo was put on, the top started to slide down. It had to be safety pinned onto bra straps to hold itself up! On another day, we’ll sew some loops onto it to string the bra straps through. Maybe when we’re not so crunched for time!

The skirt was purposefully cut way to long so that we could see where exactly it would fit with the top and the boots. It’s good to gauge “middle pieces” or essentially the piece where you have the most leeway. For instance, the boots were purchased first, the top was the most hassle to get right, so the skirt was the most adaptable piece of the ensemble. In order to get the correct look, all other pieces needed to be done in order to be sure about the length of the skirt, the flare of the skirt, and the look all together. Once pinned at the right length and sewn, all that was left was the cape.

A lot of the imagery, and the prepackaged costumes for some reason have Wonder Woman in a short waist high cape. However, if you look at Lynda Carter’s photographs, there are many with the long flowing two sided cape. Mind you, we did not have the time to make a two sided eagle influenced cape, BUT we did go with a long red satin to make ours. Gauged with the boots on we measured the material. Once hemmed, we added an adjustable tie like a drawstring so that we could create the rushed look at the shoulders. The best thing about this cape, which couldn’t be caught on camera (yet) is how it flows when you walk!

Hair and Makeup were pretty straight forward... As we’ve alluded to, we wanted big wavy hair, which involved steam curlers and a lot of back combing. The essence you want here is a lot of “pouf” at the top of the head, and a lot of wave around the face. Hairspray is a must and you must be very, very liberal! Makeup was mostly gold toned eye shadows with a very thick layer of black eyeliner. Black and gold eyelashes were added to complete the look! A true red lipstick was also used to connect the whole look. The red, MAC Pro Longwear Lipcolour in Lasting Lust which actually matched the satin complimented the whole outfit. And finally, for fun of course, gold body glitter (NIX) was applied liberally.

So all in all, not bad for an afternoon of rushed costuming spawned by the Greatest Deal of All Time ™. We will definitely be taking this costume to future venues and perhaps we may even get it judged!